
Invoice Format in Excel: Simple Layouts You Can Reuse
Many small businesses and freelancers begin with an invoice format in Excel. It is easy to open a blank sheet, type what you need, and send it as a PDF. The challenge shows up later when you are copying old files, fixing broken formulas, and wondering whether the invoice number you just used has already gone out to someone else.
A good Excel layout does not need to be clever. It just needs to be clear, consistent, and easy to reuse. In this article we will shape a practical invoice format step by step, then show how you can recreate that design inside Invozee for a smoother, more automated workflow.
Key takeaways
- A simple invoice format in Excel can work well if the sections are clearly separated and you reuse the same template for every client.
- Your layout should always include your details, client details, invoice identity, line items, taxes if needed, totals, and payment information.
- Excel is flexible but easy to break. As invoice volume grows, a tool like Invozee can handle numbering, reminders, and reporting with less manual work.
- This guide is general information, not tax advice. For rules in your country, always rely on official tax authority material or a qualified accountant.
- Why so many businesses start with Excel invoices
- Invoice format in Excel at a glance
- Step-by-step: build your Excel invoice format
- UX tips to keep your Excel invoice easy to read
- Common Excel invoice mistakes to avoid
- When to move from Excel to Invozee
- Frequently asked questions about Excel invoice formats
Why so many businesses start with Excel invoices
Spreadsheets feel comfortable. You can type, format, and drag formulas with full control. For early clients, that freedom feels like a superpower. You can adjust columns, add new rows, and keep everything in one file on your computer.
At the same time, that freedom has a cost. You are the one who has to remember invoice numbers, protect formulas, and make sure every new invoice still follows the same format. If you work with international clients or need to show tax details clearly, this becomes even more sensitive.
A better approach is to create one solid invoice format in Excel, treat it like a template, and stop experimenting with structure once it works. That is the layout we will build together in the next sections.
Invoice format in Excel at a glance
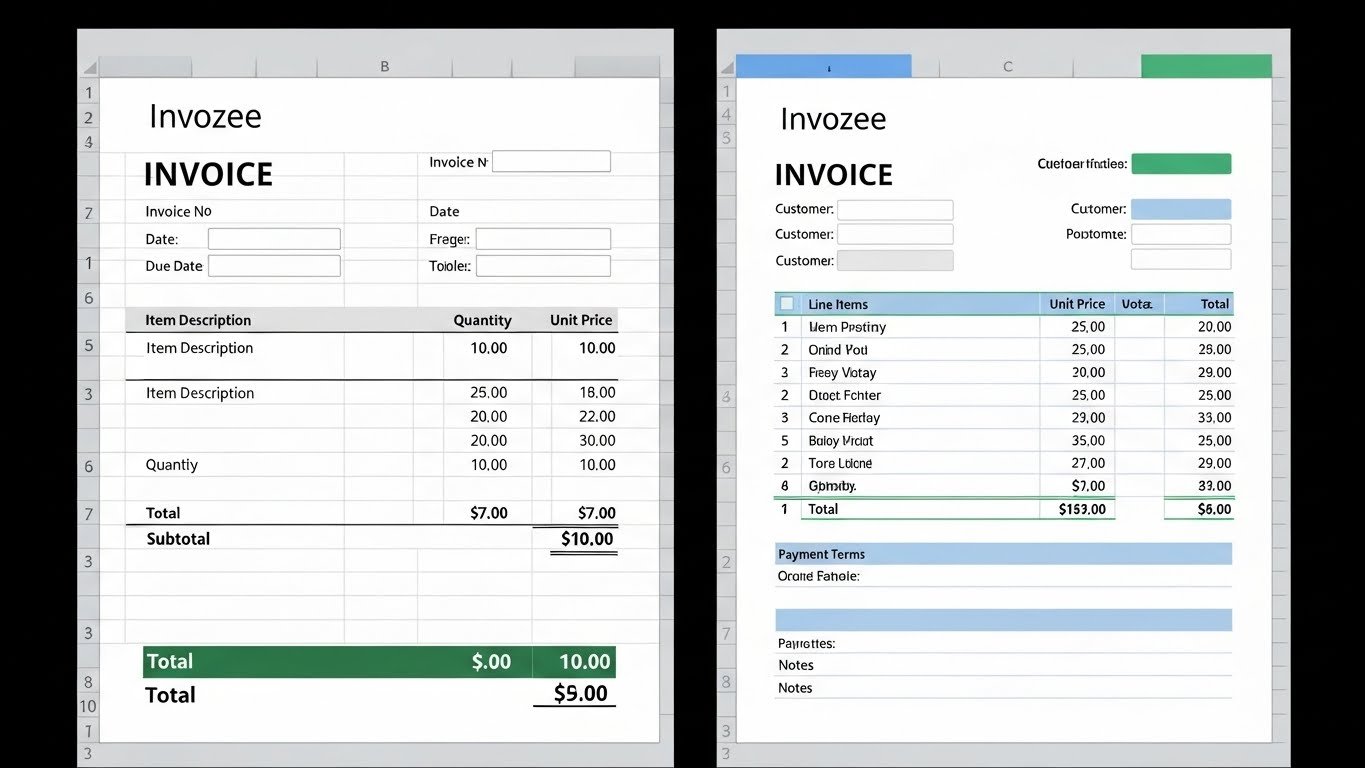
Before we dive into cells and formulas, it helps to visualise your spreadsheet from top to bottom. A practical Excel invoice format usually includes these sections.
High level Excel invoice layout
- Header: Logo, business name, and contact details at the top.
- Invoice identity: Clear label for “Invoice” or your local equivalent, plus invoice number and dates.
- Client information: Customer name, contact, and address in one tidy block.
- Line items table: Description, quantity, rate, amount, and optional tax columns.
- Totals block: Subtotal, tax amount, discounts if any, and total due.
- Payment details: Bank details or payment link and simple terms.
- Optional notes: Short message or reference notes about the work.
This structure works whether you invoice as a freelancer, a small agency, or a product business. If you mainly work project by project, you might also find our guide on how to create an invoice for freelancers helpful before you design your spreadsheet.
Step-by-step: build your Excel invoice format
Now let us turn that structure into something real inside Excel. You do not need advanced formulas for this first version. The goal is to keep everything organised and easy to update.
1. Create a dedicated invoice sheet
Start with one worksheet and name it something clear, such as “Invoice Template”. Treat this sheet as your master layout. When you need to send an invoice, you can copy the sheet and adjust only the fields that change, or save a blank version as a separate file that you duplicate for each client.
2. Add your business details in the header
In the top left area, add your business name, trading name if you use one, and contact details. Give your business name a slightly larger font size and bold weight so it stands out. Place your email address, website, and phone number under it in a smaller size.
If you have a logo, insert it into a nearby cell and resize it so that it looks sharp but not overwhelming. Using a single accent colour that matches your logo will keep the invoice consistent and easy on the eyes.
3. Set up the invoice identity block
On the right side of the header, create a small block for the core invoice identity. At a minimum include:
- A clear title such as “Invoice” at the top of the block.
- An invoice number cell where you will type a unique reference.
- The invoice date.
- The due date or payment term, such as “Due in 14 days”.
If you want to avoid repeating numbers, it helps to follow a simple pattern like “INV-2025-001”. Over time you can store your invoices in chronological order so it is easy to see which numbers are already used. Articles like our roundup of free invoice templates for 2025 can give you ideas for naming patterns and numbering styles.
4. Add the client information section
Under your header, create a block titled “Bill to”. Keep everything aligned in a small group of cells:
- Client or company name on the first line.
- Contact name or department if relevant.
- Postal address or billing address.
- Email address and reference number if your client uses purchase orders.
When you reuse your template, you will only need to update these cells for each new client instead of rebuilding the whole layout.
5. Design the line items table
This is where your Excel format does the heavy lifting. Create a table with column headings such as:
- Description of product or service.
- Quantity or hours.
- Rate or unit price.
- Amount.
- Tax rate or tax amount if you need to show it separately.
Use consistent alignment: descriptions left aligned, numbers right aligned. Apply borders around the header row and a subtle fill colour so your customer can quickly see where the table begins. You can use simple formulas such as multiplying the quantity by the rate to calculate the amount for each line.
6. Build the totals block
At the bottom right of the table, create a totals block. This usually includes three or four rows:
- Subtotal for all line item amounts.
- Total tax, if you charge it.
- Discounts if you offer any.
- Grand total due.
Give the grand total row a slightly bolder font so it stands out without looking loud. Many businesses also include a currency label here so there is no confusion when working cross border.
7. Add payment details and simple terms
Finally, help your customer pay you without guessing. In a block under the totals, include:
- Your bank account details or payment link.
- Preferred payment methods.
- Short notes about late fees or special conditions.
- A brief thank you message.
UX tips to keep your Excel invoice easy to read
An invoice is a working document, not a brochure. The person reading it often has limited time and simply wants to know what is owed, why, and when it is due. A few light design choices go a long way.
Use consistent fonts and spacing
Pick one font family and stick to it across your invoice. Use larger size and bold weight for section titles, while keeping line spacing generous so nothing feels cramped. White space around blocks of information makes the sheet feel calmer and more trustworthy.
Keep numbers clean
Format currency cells with the same number of decimal places. Right aligned currency figures are easier to scan than a mix of formats. This will also make your totals look more professional in a PDF export.
Limit colour use
A single accent colour for headings and borders is usually enough. Heavy colour blocks or multiple bright tones can distract from the content. Focus instead on clarity and alignment.
Test your invoice as a PDF
Before sending the first invoice built on your new format, export it to PDF and open it on a laptop and a phone. Check that all text is readable, that nothing is cut off at the margins, and that your totals are obvious at a glance.
Common Excel invoice mistakes to avoid
Even with a neat layout, it is easy to fall into habits that create risk. Here are a few patterns to watch out for when you lean on Excel for invoices.
Copying old invoices as a starting point
Many people duplicate the last invoice file and update details for the new client. This is quick but risky. It only takes one missed field, such as a client name or an old rate, for the wrong information to go out. It is better to copy a clean, blank template instead.
Leaving formulas unprotected
When totals rely on formulas, accidental edits can break your calculations. Consider protecting cells that contain formulas so you do not overwrite them while adjusting quantities and descriptions.
Weak backup and version control
If your invoices are stored as separate files in a single folder, it can be hard to see what is paid or overdue. Guidance from resources such as the IRS recordkeeping overview makes it clear that accurate records are essential for tax and audit purposes. Spreadsheets can be part of that system but are rarely the whole answer.
No central list of invoice numbers
Without a register, duplicate numbers creep in over time. This may confuse customers and complicate accounting work. A simple log inside Excel can help, but an invoicing tool tracks this automatically.
When to move from Excel to Invozee
Excel is a great starting place. At some point, though, you stop wanting to think about formulas and file names. You want to send an invoice in a few clicks, see its status, and trust that reminders will go out if payment is late.
That is where Invozee comes in. You can take the structure you perfected in Excel and recreate it as a reusable template inside the app. From there, Invozee handles the busy work while you keep the clarity you like.
Turn your Excel format into an Invozee template
In Invozee you can set up invoice templates that mirror your spreadsheet layout. Add your logo, preferred wording, and any required tax fields once. After that you only fill in client details and specific line items.
Reuse client and item details safely
Instead of copying rows in Excel, Invozee stores client profiles and item descriptions for you. When a repeat customer orders from you, their details are ready in a couple of clicks. This builds on many of the ideas we cover in our invoice vs receipt guide where we talk about keeping customer facing documents clear and consistent.
Improve reporting and follow up
As your business grows, it becomes important to see who has paid, who is late, and what your monthly invoicing volume looks like. Tools like Invozee and reporting frameworks highlighted by resources such as HubSpot’s invoicing guides can help you understand your cash flow much more quickly than a folder of spreadsheets.
Ready to outgrow your Excel invoice format
You can keep the invoice structure you trust and still remove the repetitive work. Turn your Excel layout into a reusable template in Invozee, send invoices in a few clicks, and track payments without digging through files.